Hey guys.
You know that sick feeling when you pick up your board after a session and notice a chunk missing from the rail?
Or worse — you press on the deck and it feels… hollow. Soft. Like something shifted underneath.
Yeah. Board damage.
Here’s the good news: most kiteboard damage is completely fixable at home. You don’t need to send it to a shop. You don’t need to buy a new board. You need the right epoxy, about an hour of patience, and this kiteboard repair guide.
Let’s get into it.
Note: This post contains affiliate links. Full Disclosure.
The #1 Mistake That Destroys Boards (Read This First)
Before we talk about anything else, I need to address this because I see it constantly.
Never use polyester resin on an EPS foam core board.
Most modern kiteboards — especially twintips — have an EPS (Expanded Polystyrene) foam core. Polyester resin dissolves EPS. Literally melts it. You’ll open up a small ding and turn it into a crater.
Always check your board core first. If you’re not sure, assume EPS and use epoxy. West System epoxy is the industry standard — it works on every board type and bonds properly every time. No guessing.
This one mistake costs people hundreds of euros in boards every year. Don’t be that person.
What Type of Damage Do You Actually Have?
Before you grab the epoxy, identify what you’re dealing with. Each repair is slightly different.
Ding or pressure dent — a small impact crack or dent in the deck or base. Most common. Usually doesn’t reach the foam core.
Rail damage — chunk out of the edge of the board. Often happens from rocky beaches, hard landings, or board-to-board contact.
Delamination — the fiberglass skin separates from the foam core. Feels soft and hollow when you press it. Water gets in and makes it worse every session you ignore it.
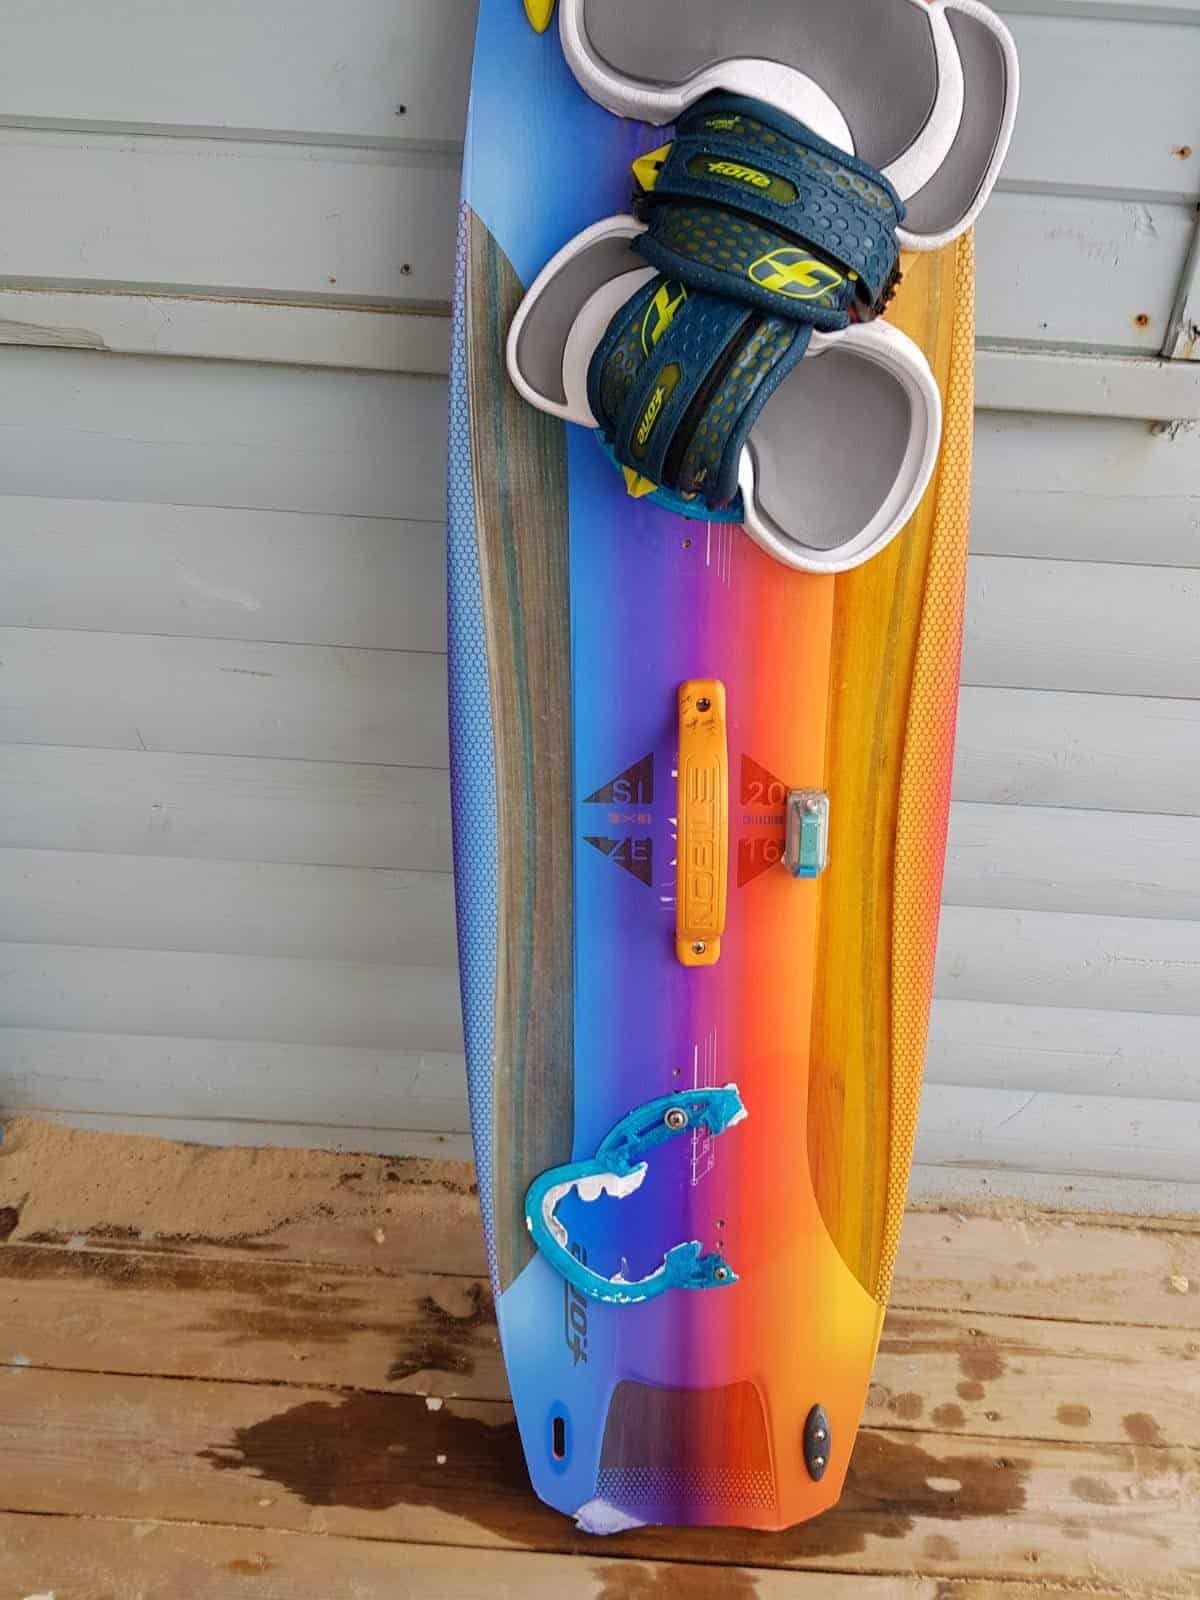
Fin box damage — the fin box has cracked, loosened, or the surrounding area is compromised. One of the more annoying repairs but very doable.
Base damage — scratches or gouges on the bottom. Usually cosmetic but deep ones affect ride feel.
Let’s go through each one.
Tools & Materials You’ll Need
Get everything ready before you start. Mid-repair is not the time to realise you’re missing something.
- Epoxy resin + hardener (West System 105/205 or similar — NOT polyester)
- Solarez UV epoxy (great for small dings — cures in sunlight in minutes)
- Fiberglass cloth (for structural repairs)
- Sandpaper — 80 grit, 120 grit, 220 grit, 400 grit
- Acetone or isopropyl alcohol (surface prep)
- Mixing cups and sticks
- Masking tape
- Razor blade or sharp knife
- Latex gloves
- Flat squeegee or old credit card
If you want the full specialist toolbox breakdown, check the kite repair kit guide — most of this stuff overlaps.
How to Repair a Kiteboard Ding (Small Impact Damage)
This is the most common Kiteboard repair, a small crack or dent, usually on the deck where you stand or the base from impact.
Step 1 — Dry it out completely. Seriously — don’t skip this part. Water trapped under a repair = the repair failing within a few sessions. Leave the board in a warm room for at least 24–48 hours with the ding facing down so any water can drain. If you’re in a rush, a hairdryer on low heat from a distance works — just don’t cook it.
Step 2 — Open it up slightly. Use a sharp knife or razor blade to clean the edges of the crack. Remove any loose fiberglass flaps. I know it feels wrong but do it anyway — the cleaner the edge the better the bond.
Step 3 — Clean the surface. Wipe down with acetone or isopropyl alcohol. Let it evaporate fully. Don’t touch the cleaned area with bare fingers — the oils from your skin contaminate the surface and weaken adhesion.
Step 4 — Mix and apply epoxy. Follow your epoxy ratio exactly. West System 105/205 is 5:1 by weight — don’t eyeball it. Mix for a full two minutes. Apply to the ding, working it into any cracks. For small dings, one layer is usually enough. For deeper damage, do two thin layers rather than one thick one — thick layers can generate too much heat as they cure and cause problems.
Quick fix alternative: For tiny surface dings, Solarez UV epoxy is brilliant. No mixing, no waiting — apply, smooth it out, hold it in sunlight for 3–4 minutes and it’s cured solid. Keep a tube in your bag.
Step 5 — Sand and finish. Once fully cured (minimum 8 hours for standard epoxy), sand starting with 80 grit to level the repair, then work up through 120, 220, and 400 grit to blend it smooth. If you want to restore the board finish, a coat of board wax or UV-resistant clearcoat on top seals everything.
How to Repair Kiteboard Rail Damage
Rail damage hurts to look at but it’s very fixable. The rail takes the most impact on a kiteboard so the repair needs to be solid, not just cosmetic.
Step 1 — Remove all loose material. Any fiberglass that’s cracked, lifting, or soft needs to come off. Use a knife to trim cleanly. If there’s foam exposed, make sure it’s completely dry before continuing.
Step 2 — Sand the area back. Sand 2–3cm beyond the damage in every direction. The repair needs to overlap onto undamaged material — this is what gives it strength. Use 80 grit for this step.
Step 3 — Cut a fiberglass patch. For rail repairs you need fiberglass cloth, not just epoxy alone. Cut a piece slightly larger than the sanded area. If the damage is deep, cut two — you’ll lay them up in layers.
Step 4 — Wet out and apply. Mix your epoxy. Wet out the repair area with a thin layer first, then lay the fiberglass cloth over it and work more epoxy into the cloth with your squeegee until it goes translucent. No dry spots. No air bubbles.
Step 5 — Shape while wet. This is the key step most people miss on rail repairs. Before the epoxy kicks, shape the repair to match your rail profile using gloved fingers or a curved tool. It’s much easier to shape it now than to sand away a big lump later.
Step 6 — Cure, sand, finish. Same as the ding repair — let it cure fully, sand through the grits, finish smooth.
How to Fix Kiteboard Delamination
This one’s serious and you need to catch it early. Once water gets under a delamination and the foam absorbs it, the repair becomes much harder. If your board sounds hollow when you knock on it — fix it now, not next season.
Step 1 — Find the full extent of the damage. Tap the board all over with your knuckles. The delaminated area sounds noticeably different — duller, hollow. Mark the full boundary with masking tape. You’ll be surprised how far it extends beyond what you can see.
Step 2 — Drill small injection holes. This is the specialist method. Using a 3–4mm drill bit, drill small holes at the edges of the delaminated area — just through the fiberglass skin, not deep into the foam. These are your epoxy injection points.
Step 3 — Inject low-viscosity epoxy. Use a syringe to inject thin epoxy through the holes into the gap between the skin and the foam. Work slowly, moving from hole to hole. You want epoxy to spread through the entire void.
Step 4 — Clamp or vacuum bag it. Once injected, you need to press the skin back onto the foam while the epoxy cures. Clamps with a flat caul board on top work well. Vacuum bagging is the professional method if you have access to it — it applies even pressure across the whole area. At minimum, stack some heavy books on a flat board over the repair area.
Step 5 — Fill the drill holes. Once fully cured, fill the injection holes with a small amount of epoxy, sand flush, and finish as normal.
How to Repair a Kiteboard Fin Box
A loose or cracked fin box is a safety issue as much as a performance one. A fin that rips out mid-ride has ruined more than one session I know of.
Step 1 — Remove the fin completely. Assess the damage. Is it the fin box itself that’s cracked, or is the surrounding board material compromised? If just the box is slightly loose, that’s a straightforward rebed. If the surrounding laminate is cracked and delaminated, do that repair first.
Step 2 — Clean out the box area. Remove any old resin, sand the inside of the fin box hole and the surrounding deck area. Clean with acetone.
Step 3 — Re-bed with thickened epoxy. Mix epoxy with a small amount of filler (silica or microballoons) to create a slightly thicker paste. This stops it running out of the box hole before it cures. Apply around and under the fin box, reinsert it, and align it perfectly. Wipe away any squeeze-out immediately.
Step 4 — Reinforce the surrounding area. Once the box is cured in, lay a small fiberglass reinforcement patch around the top of the fin box where it meets the deck. This distributes the load properly and stops it loosening again.
Step 5 — Let it cure fully before riding. Don’t rush this one. Give it a full 24 hours minimum before putting the fin back in and getting on the water. A fin box repair that fails mid-session is much worse than waiting one extra day.
When to Repair vs. When to Replace
Not every board is worth fixing. Here’s how I think about it:
Repair it when:
- Damage is isolated and the rest of the board is solid
- The core is dry
- The repair cost is under 30–40% of the board’s value
- You have the skills and tools to do it properly
Replace it when:
- Multiple delaminations across the whole board
- The foam core is waterlogged — you’ll never fully dry it out
- Structural cracks through the board (not just surface)
- The board is old and this is the third repair in a year — it’s telling you something
Look, if the damage is isolated and the core is still dry — fix it. If you’re pressing on three different spots and they all sound hollow, and this is repair number three in a year, the board is done. No shame in it. Buy a new one.
Preventing Board Damage in the First Place
I learned most of these the hard way, so you don’t have to.
Honestly, most board damage is avoidable. A few habits make a big difference:
- Rinse with fresh water after every session — salt water accelerates fiberglass breakdown over time
- Store it in a board bag — UV and heat are silent killers of epoxy laminates
- Don’t leave it on rocky beaches unprotected — tail pads and rail tape are cheap insurance
- Check it monthly as part of your regular gear check — catch small dings before water gets in and turns them into delaminations
Speaking of regular checks — if you haven’t grabbed the free kite maintenance calendar yet, there’s a board inspection section in there too. Print it, use it.
Quick FAQ
Can I use car body filler (Bondo) to repair a kiteboard?
Please don’t. It’s not flexible enough for a board that flexes constantly underfoot and it absorbs water. Use epoxy — it’s the right tool for the job.
How long does an epoxy repair last?
Done properly, indefinitely. I’ve got boards with repairs that are three seasons old and holding perfectly. The key is clean prep and letting it cure fully before getting back on the water.
Can I repair a board in cold weather?
Epoxy cures slower in cold temperatures and may not cure properly below about 15°C. If you’re repairing in winter, work in a heated room and give extra cure time. Some epoxy systems have low-temperature hardeners specifically for this.
My board has a crack right through it — is that fixable?
A full structural crack through the board is a major repair. It’s possible but it requires proper fiberglass layup to restore strength, not just filling the gap with epoxy. If you’re not confident with fiberglass work, this is one for a professional shop.
How do I know if water got into my foam core?
Weight is the best indicator — a waterlogged board feels noticeably heavier than it should. You can also drill a tiny test hole in a non-critical area — if moisture comes out, water is in there.
Your board takes a beating every session. Rocks, hard landings, board rails, fin strikes — it adds up.
But a properly repaired board rides just as well as a new one.
Take the time, do it right, and for the love of everything don’t use polyester resin.
You’ll be back on the water with a board that’ll last for years.
Ride hard. 🤙
Got a repair question I didn’t cover? Drop it in the comments — I’ll answer every one.
I’ve been riding since 2009 — mostly Red Sea and Mediterranean, a season in Tarifa, a few trips to Brazil. I started this site because the maintenance advice online was either vague or wrong, and I got tired of watching riders show up with gear that should have been retired two seasons ago. I fix what other people ignore.