Hey guys.
The kitesurfing harness is the one piece of gear that touches your body every single session. Everything else — the kite, the bar, the board — you’re interacting with through lines and leverage. The harness is different. It’s directly on you, transferring every load from the kite through your body to the water.
Get it right and it disappears. You stop thinking about it after five minutes on the water.
Get it wrong and it’s all you think about. Riding up under your ribs. Chafing across your hips. Lower back aching by the end of the session because the spreader bar position was off.
I’ve ridden in bad harnesses. Everyone has when they’re starting out — usually because they borrowed something or bought whatever was cheap. This kitesurfing harness guide covers everything you need to choose correctly the first time.
Note: This post contains affiliate links. Full Disclosure.
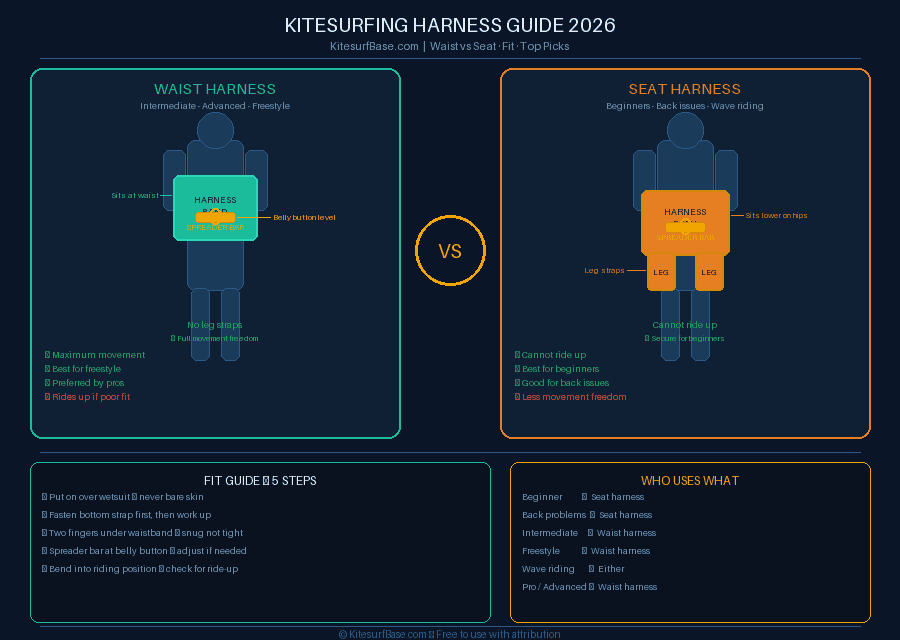
Kitesurfing Harness Types — Waist vs Seat
The first decision in choosing a kitesurfing harness is the type. Two options — waist harness and seat harness. Both do the same job. They feel completely different.
Kitesurfing Waist Harness
The kitesurfing waist harness sits around your waist, above the hips. The spreader bar and chicken loop hook sit at your centre of gravity. Most experienced riders use a waist harness — it allows full freedom of movement, doesn’t restrict leg movement, and once properly fitted feels like part of your body.
Who it’s for: Intermediate to advanced riders. Riders who want maximum movement freedom. Freestyle riders. Anyone who’s past the initial learning stages and wants to commit to a harness for the long term.
The downside: A waist harness rides up if the fit is wrong or if your core isn’t engaged. A harness that rides up into your ribs mid-session is one of the most uncomfortable experiences in kitesurfing. Getting the fit right matters more with a waist harness than with a seat harness.
Kitesurfing Seat Harness
The kitesurfing seat harness wraps around your waist and hips with leg straps underneath. The load sits lower on your body — closer to your hips and legs than your core. It physically cannot ride up.
Who it’s for: Beginners, without question. The seat harness is the right choice for anyone in their first season. It’s also the right choice for riders with lower back problems, and for wave riders who want a locked-in feeling with more security in the lip.
The downside: Leg straps restrict movement compared to a waist harness. Some riders find them uncomfortable in the crotch area, especially in longer sessions. Most riders outgrow the seat harness as their skills develop — but for the learning phase, it’s the right tool.
How to Choose a Kitesurfing Harness — The Key Factors
Knowing the types is the start. Knowing how to choose a kitesurfing harness that actually works for your body and your riding is the part most guides skip.
1. Fit Over Brand
The most expensive kitesurfing harness on the market is useless if the fit is wrong for your body shape. Every brand cuts their harnesses slightly differently. What fits perfectly on one rider sits awkwardly on another.
If you’re buying in person — try it on properly. Hook in to the display bar if the shop has one. Mimic your riding position. Does the spreader bar sit at your belly button? Does the top of the harness dig into your ribs when you bend forward? Does it feel locked to your body or loose?
If you’re buying online — check the brand’s sizing chart carefully and read reviews specifically about fit, not just quality. A harness that rides up or digs in is a harness you’ll stop using.
2. Spreader Bar Position
The spreader bar — the rigid bar that the chicken loop hooks onto — should sit at or just below your belly button when you’re in your riding position. Too high and the kite pulls you forward from your chest. Too low and your lower back takes the load incorrectly.
Most modern kitesurfing harnesses have an adjustable spreader bar position. Use it. Take ten minutes to dial it in on the beach before your first session in a new harness.
3. Stiffness — Soft vs Hard Shell
Kitesurfing harnesses come in soft shell and hard shell constructions.
Soft shell harnesses are lighter, more flexible, and more comfortable for beginners. They conform to your body shape over time. The trade-off is less support under high load — in stronger wind or powered riding, a soft shell harness compresses more.
Hard shell harnesses offer more back support and hold their shape under load. Better for powered riding, freestyle, and riders with back issues. Less comfortable initially — there’s a break-in period.
For beginners — soft shell is fine. For riders spending long sessions in 25 knots — hard shell earns its place.
4. Hook vs Spreader Bar System
Most kitesurfing harnesses use a fixed hook spreader bar that the chicken loop slides onto. Some use a sliding system or a ball-and-socket that allows more rotational freedom.
For most riders — a standard fixed hook works perfectly. If you’re doing freestyle unhooked tricks, a swivel system matters more. For beginners and intermediate riders, don’t overthink it.
5. Built-in vs Separate Impact Protection
Some kitesurfing harnesses include built-in back protection or impact padding. This is worth having, especially for beginners still figuring out how to fall. It’s not a substitute for riding safely — see the kitesurfing safety guide for the full picture — but it reduces bruising in hard wipeouts.
How to Fit a Kitesurfing Harness Correctly
A kitesurfing harness that’s the right size but fitted incorrectly causes the same problems as one that’s the wrong size. Here’s how to fit it properly.
Step 1 — Put it on over your wetsuit or rash vest. Never size a harness over bare skin — you’ll always ride with layers underneath.
Step 2 — Fasten all straps starting from the bottom. Bottom strap first, then middle, then top if there are multiple. This seats the harness correctly on your hips before you tighten the upper section.
Step 3 — Tighten until snug, not tight. You should be able to fit two fingers under the waistband. Too loose and it rides up. Too tight and it restricts breathing and movement — you’ll be uncomfortable within twenty minutes.
Step 4 — Check the spreader bar position. With the harness on and tightened, the spreader bar should sit at your belly button. Adjust the bar position using the harness’s adjustment system until it’s right.
Step 5 — Bend into your riding position. Crouch slightly, lean back as if you’re riding. Does the top of the harness dig into your ribs? Does it ride up? If either of those happen on the beach in calm conditions, they’ll be worse on the water. Adjust before you go out.
Step 6 — Check the chicken loop connection. Hook in on the beach, check the loop sits cleanly on the hook without binding. Check your safety release is accessible and unobstructed by the harness. The bar maintenance guide covers safety release function in detail.
Kitesurfing Harness Maintenance
A kitesurfing harness lives in salt water. Without maintenance it degrades faster than it should.
Rinse after every session. Fresh water, thoroughly. Salt crystals work into the stitching, the buckles, and the spreader bar mechanism and corrode them from the inside. A two-minute rinse at the beach shower extends harness life significantly. Same principle as bar maintenance — salt is the enemy.
Check the stitching regularly. The load points — where the spreader bar attaches, where the leg straps join the main body — take the most stress. Check them monthly as part of your maintenance routine. Stitching that’s fraying at a load point needs professional repair before the next session.
Store it dry and out of UV. UV degrades neoprene and nylon faster than almost anything else. Don’t leave your harness baking in the car or on the beach between sessions. Store it dry, in a bag, out of direct sun.
Replace the spreader bar hook when it shows wear. The hook takes contact from the chicken loop every session. Over time the spreader bar wears a groove that can cause the loop to jam or release incorrectly. Check it every few months.
Kitesurfing Harness Safety — What Most Riders Miss
The kitesurfing harness is a safety component, not just a comfort component. A few things worth knowing.
Your safety release must be accessible. Whatever kitesurfing harness you’re using, check that your primary quick release is reachable with either hand and not obscured by the harness body or any attached accessories. Test it on the beach before every session.
Leash attachment point. Your safety leash — the line that connects your bar to your harness or wrist — should attach to the dedicated leash point on your harness, not improvised around a strap. Check it’s secure before you launch. More on leash setup in the kitesurfing beach safety guide.
Don’t ride a harness with damaged load stitching. A harness that fails under load in powered conditions is a serious incident. If the stitching at the spreader bar attachment or leg straps is visibly damaged — don’t use it until it’s repaired.
My recommendation: Mystic KITE SAFETY LEASH Neoprene safety leash
Waist vs Seat Harness — The Honest Summary
You’re a beginner → seat harness. Every time. The stability and security while you’re still figuring out body position, board control, and kite handling makes learning faster and more comfortable. You can move to a waist harness when your riding is established.
You have lower back problems → seat harness or a hard shell waist harness with strong lumbar support. The load distribution of a seat harness is easier on the lower back for most riders.
You want to do freestyle → waist harness, soft or hard shell depending on preference. Unhooked tricks need the movement freedom a waist harness gives you.
You’re an experienced all-round rider → waist harness. It’s the most versatile kitesurfing harness for everything from cruising to wave riding to light freestyle. Once you’re past the learning phase there’s almost no reason to go back to a seat harness.
If you’re still unsure — rent before you buy. Most kite schools and rental shops have both types. An hour in each tells you more than any guide can.
Riding with back pain after sessions? The harness back pain guide covers exactly why it happens and what to fix first.
Quick FAQ
How tight should a kitesurfing harness be?
Snug — two fingers under the waistband. Tight enough that it doesn’t move on your body, loose enough that you can breathe fully and move freely. If you’re adjusting it constantly during a session it’s either the wrong size or incorrectly fitted.
Can I use a wakeboard harness for kitesurfing?
No. Wakeboard harnesses aren’t designed for the load angles and quick release requirements of kitesurfing. Use a kitesurfing-specific harness with a proper chicken loop hook and an accessible safety release.
How long does a kitesurfing harness last?
With proper rinsing and storage — 3 to 5 seasons for most riders. Inspect the load stitching annually. Replace when the stitching shows wear at the load points or the spreader bar hook is visibly grooved.
Should beginners buy a cheap harness?
Not the cheapest available — but you don’t need a top-end harness either. Mid-range from a reputable brand like Mystic, ION, or Dakine gives you proper construction and fit without overspending. The kitesurfing for beginners guide covers the full beginner gear picture.
My harness rides up constantly — what’s wrong?
Either it’s too loose, the wrong size, or the spreader bar position is too high. Tighten the bottom strap first, then work up. If it still rides up after proper tightening — it’s the wrong cut for your body shape. Try a different brand.
I went through three harnesses in my first two seasons. Wrong size, wrong type, wrong fit — all of them my own fault for not doing the research.
The fourth one I tried on properly, adjusted the spreader bar on the beach, and rode in it for the next four years.
A kitesurfing harness is one of those pieces of gear where the right choice genuinely makes the sport more enjoyable. Take the time to get it right.
Ride hard. 🤙
Riding in a harness that’s worked particularly well for you? Drop it in the comments — always useful to hear what’s working for different body types.

I’ve been riding since 2009 — mostly Red Sea and Mediterranean, a season in Tarifa, a few trips to Brazil. I started this site because the maintenance advice online was either vague or wrong, and I got tired of watching riders show up with gear that should have been retired two seasons ago. I fix what other people ignore.