Hey guys.
I’ve been fixing kites since before most people thought it was worth doing.
Back when I started, the standard advice was: gear breaks, send it back, buy new. Nobody talked about doing it yourself. The brands didn’t encourage it. The beach culture didn’t support it.
Now? Riders are fixing bladders in their living room, patching canopies in car parks, and rebuilding kiteboards with epoxy setups that would make a boat builder proud. The information is out there. The products are good. And once you know what you’re doing, most kitesurfing repairs are genuinely not that hard.
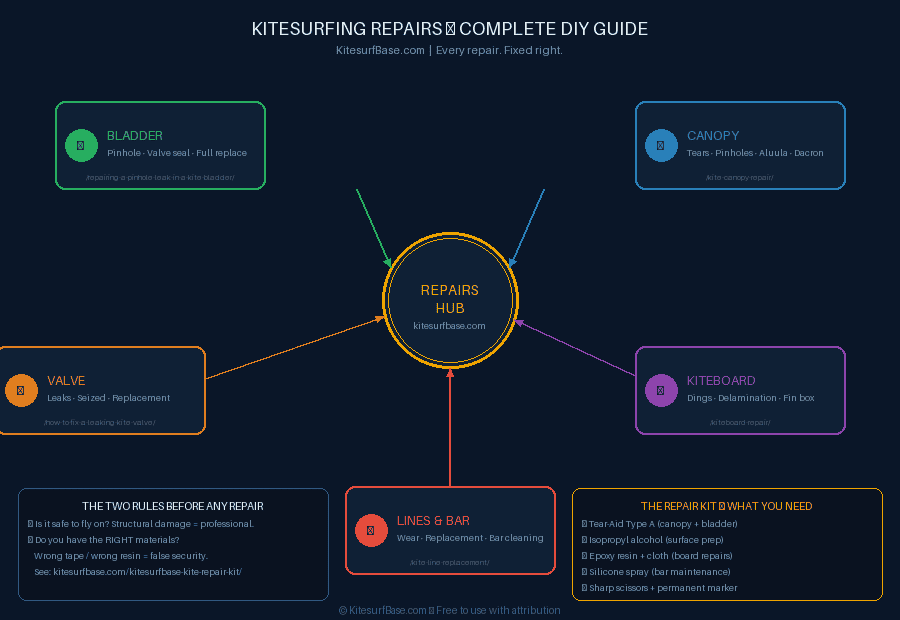
This kite repair guide covers every major gear failure you’ll encounter — from a pinhole bladder to a delaminated board.
Note: This post contains affiliate links. Full Disclosure.
Before You Fix Anything — The Two Questions
Kite gear repair decisions always start with the same two questions.
Is it safe to fly on? Some damage is cosmetic. Some is structural. A small canopy tear in the middle of a panel is a fifteen-minute fix. A seam failure near a load-bearing bridle attachment point is a professional job — full stop. Before you reach for the tape, assess whether the damage affects the structural integrity of the gear. If you’re not sure — don’t fly on it.
Do you have the right tools and materials? A repair done with the wrong tape, the wrong resin, or the wrong technique creates a false sense of security. The repair looks done but it fails at the worst moment. Every repair in this guide specifies exactly what to use and why. If you don’t have the right materials — get them first. The specialist repair kit covers everything you need for 95% of home repairs.
Kite Bladder Repairs
The bladder is the inflatable inner tube inside your leading edge and struts. When it fails — slow leak, pinhole, or full blowout — the kite goes soft and loses its flying shape.
Bladder repairs are cheap, logical, and last years when done right. The first time I fixed one I expected it to be complicated. It wasn’t. Thirty minutes, a patch kit, and a bucket of water.
What you’ll deal with:
- Pinhole leaks — most common, usually from sharp contact or material fatigue
- Valve area leaks — where the bladder meets the inflation valve
- Seam failures — less common, usually on older or heavily used kites
- Full bladder replacement — when the bladder is too far gone to patch
The key rule with bladder repairs: find the leak before you fix it. Rushing straight to patching without locating the exact leak point is how you end up re-doing the job. Inflate the bladder outside the kite, submerge it in water, and look for bubbles. Mark it. Then patch it.
→ Full step-by-step guide: Repairing a Pinhole Leak in a Kite Bladder
Kite Valve Repairs
The inflation valve is the interface between your pump and your bladder. It takes more mechanical stress than any other single component — pumped hard every session, pulled at every deflation, and exposed to sand and salt constantly.
Valve problems show up as slow leaks that get worse over time, or a valve that won’t hold pressure at all. Sometimes it’s the valve itself. Sometimes it’s the bladder-to-valve seal.
What you’ll deal with:
- Leaking one-pump valves — the one-way mechanism has failed or is contaminated
- Valve seat leaks — the seal between valve and bladder is compromised
- Stuck or jammed valves — sand contamination in the mechanism
- Full valve replacement — when the valve body is cracked or the mechanism is beyond cleaning
The key rule with valve repairs: don’t over-tighten. It’s instinctive to crank a valve tight when it’s leaking — but over-tightening deforms the seal and makes the leak worse. Clean first, reseat, then tighten just enough.
→ Full step-by-step guide: How to Fix a Leaking Kite Valve
Kite Canopy Repairs
The canopy is the fabric that gives your kite its aerodynamic shape. It takes constant UV exposure, flexing loads, and occasional contact with rocks, shells, and other sharp objects.
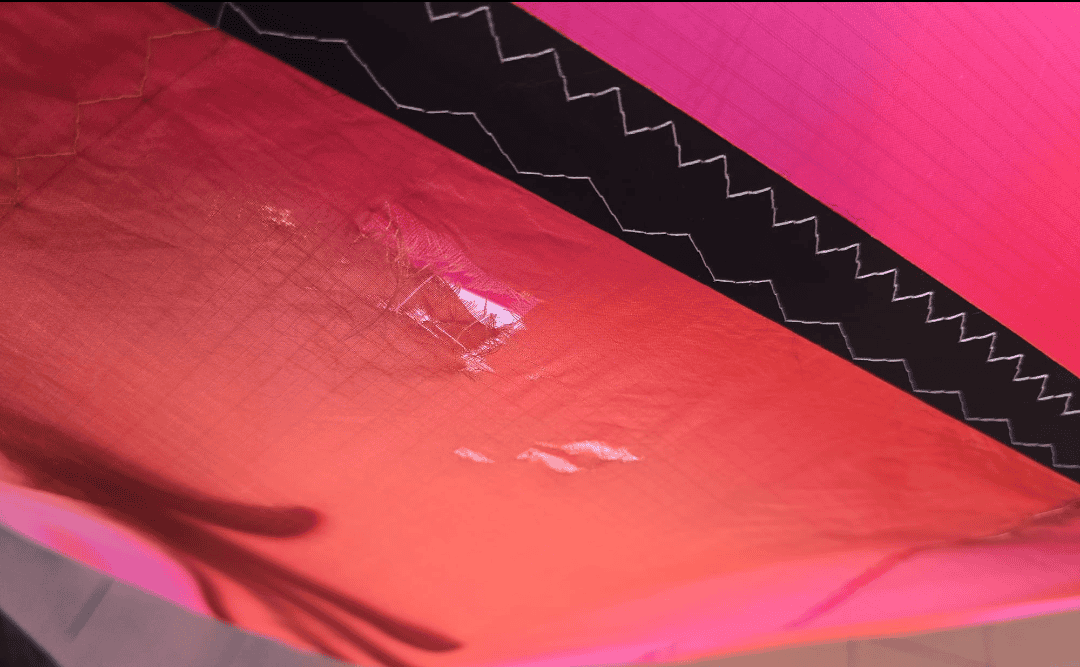
Most canopy damage is completely fixable at home. The right tape, proper surface prep, and a bit of patience is all it takes for Level 1 and Level 2 tears. The repair often outlasts the surrounding fabric.
What you’ll deal with:
- Pinholes and micro-tears — shell fragments, grit, stitching stress
- Clean tears (5mm–5cm) — the most common damage, sharp contact
- Ragged or L-shaped tears (5cm+) — hard crashes, lines under load
- Trailing edge and Dacron section damage — different material, different tape
- Aluula canopy damage — high-end material, specific repair products required
The key rule with canopy repairs: clean prep beats everything. Any salt, sand, moisture or skin oil under the patch and it won’t bond. Isopropyl alcohol, let it dry, don’t touch the cleaned area. That single step determines whether your repair lasts one session or three seasons.
→ Full step-by-step guide: How to Repair a Kite Canopy Tear
Kiteboard Repairs
Kiteboards take serious abuse — impacts with the water at speed, fin box stress, rail dings from rocks and shells, and the constant flex load of riding. Most board damage is repairable with standard epoxy materials.
Board repairs are different from everything else here. You’re not sticking something down — you’re rebuilding material that was carrying load. Get the technique wrong and it holds for a session then fails when you really push it.
What you’ll deal with:
- Rail dings — most common, cosmetic to moderate structural
- Deck compression — soft spots from repeated hard landings
- Delamination — the fibreglass skin separating from the foam core
- Fin box damage — cracked or pulled-out fin boxes
- Through-holes — rare but serious, usually from sharp impacts
The key rule with board repairs: use epoxy, not polyester resin. Polyester resin doesn’t bond properly to the existing epoxy construction of modern kiteboards. It looks fine initially and then fails under flex load. Epoxy only — for the love of everything, epoxy only.
→ Full step-by-step guide: How to Repair a Kiteboard
Kite Line Repairs and Replacement
Lines are the most overlooked component in a kite setup. Riders check their kite, check their bar, and roll the lines up without a second thought — until something goes wrong.
The reality is that Dyneema lines degrade progressively through normal use. Salt crystallisation, UV exposure, and load cycles all shorten their working life. A line set that looks fine can be significantly weaker than it was when new.
What you’ll deal with:
- Line wear at knot connection points — most common failure location
- Fuzzing and stiffness — signs of fibre breakdown
- Unequal line lengths — from differential stretch and shrinkage
- Flag line wear — the safety line that takes the most abuse
- Full line set replacement — when individual repairs aren’t enough
The key rule with line repairs: worn lines are not a wait-and-see situation. A line failure on the water is a safety incident, not just a gear failure. If lines are showing significant wear — replace them. Line sets are cheap compared to the alternative.
→ Full step-by-step guide: Kite Line Replacement — When and How
Kite Bar and Bridle Repairs
The bar and bridle system take more salt and grit exposure than any other part of your setup. Every session deposits salt crystals into the depower cleat, the pulleys, the chicken loop mechanism and the bridle attachment points. Left uncleaned, this gradual contamination becomes gradual failure.
Most bar and bridle issues are maintenance problems that became repair problems — caught early they’re a cleaning job, left too long they become a component replacement job.
What you’ll deal with:
- Stiff or seized depower cleat — salt crystallisation in the mechanism
- Jammed or worn pulleys — contaminated bearings or worn surfaces
- Safety release stiffness — the most important one to catch early
- Worn pigtail connections — fraying at bridle knot points
- Bridle line wear — especially at pulley contact points
The key rule with bar and bridle repairs: test your safety release before every session. It should activate instantly with the correct force — firm enough not to trip accidentally, light enough to work immediately in an emergency. If it feels different from normal — fix it before you fly, not after.
→ Bar cleaning and maintenance guide: How to Clean and Maintain Your Kite Bar
→ Bridle tuning and adjustment: Kite Bridle Tuning — The Complete Guide
The Repair Kit — What You Actually Need
Every guide above references specific tools and materials. Rather than buying things piecemeal, the specialist repair kit guide covers the complete toolbox — what to carry, what to leave at home, and what the difference is between a kit that gets you through a field repair and one that handles everything.
The short version: Tear-Aid Type A, isopropyl alcohol, a sharp pair of scissors, epoxy resin and cloth for board work, and a silicone lubricant for bar maintenance. That covers 95% of what you’ll ever need.
When Not to DIY
Kitesurfing diy repair covers most situations. Some don’t.
Take it to a professional when:
- Structural seam failures — the stitching needs the right thread, right tension, right needle
- Load panel damage near bridle attachment points — these are structural, tape isn’t enough
- Full bladder replacement on a complex multi-strut kite — doable but time-consuming if it’s your first time
- Any damage you can’t confidently assess — if you’re not sure what you’re looking at, get a second opinion before you fly on it
- Safety system failure you can’t diagnose — a bar that won’t release properly needs professional attention
Most kite brands have authorised repair centres. Many sail repair shops work on kites too. A professional repair on something structural is cheaper than a new kite — and a lot cheaper than an incident caused by gear that wasn’t repaired properly.
Maintenance Prevents Most Repairs
A large percentage of the repairs in these guides are preventable with consistent maintenance. Bladder leaks caught at the pinhole stage. Canopy tears found before they grow. Bar components cleaned before they seize.
The maintenance calendar covers how to repair kitesurfing gear before problems become serious — monthly checks, after-session rinse, pre-season inspection.
The Mechanic’s Workshop is the broader hub for everything maintenance and repair related on this site — worth bookmarking if you haven’t already.
Quick FAQ
Can a beginner do these repairs?
Most of them, yes. Bladder patching, canopy repair, and bar cleaning are all beginner-friendly if you follow the steps carefully. Board repair with epoxy takes a bit more patience but it’s not beyond anyone willing to take their time. The guides are written to be followed by someone doing it for the first time.
How do I know if my repair is safe to fly on?
After any repair — inflate, inspect, test. For canopy and bladder repairs: inflate fully and check the repair area for lifting, bubbling, or leaks. For board repairs: flex the repaired area carefully and check for movement or cracking sounds. If anything looks or feels wrong — don’t fly on it yet.
Where do I get repair materials?
The repair kit guide has links to everything. Most materials are available on Amazon or from specialist kite shops. Aluula-specific tape needs to come from Aluula directly or from your kite brand’s dealer.
My kite is old — is it worth repairing?
Depends on the damage and the kite. A well-maintained kite is worth repairing. A kite with multiple structural issues, UV-degraded fabric, and worn safety systems may not be — the cost of professional repairs can approach the value of the kite. Be honest about the overall condition, not just the specific damage in front of you.
How long do home repairs last?
Done properly with the right materials — years. The guides here aren’t about getting through one more session. They’re about permanent repairs done right. Clean prep, correct materials, full cure time. That’s what makes the difference between a repair that lasts a season and one that’s still holding five years later.
Most of the repairs on this page I’ve done at least once in a car park, a hallway, or a living room floor. None of them required a professional the first time I did them — they just required reading the guide properly and not rushing the cure time.
Pick the guide for whatever’s broken. Take your time with it.
Ride hard. 🤙
Got a repair situation not covered here? Drop it in the comments and I’ll do my best to help.
I’ve been riding since 2009 — mostly Red Sea and Mediterranean, a season in Tarifa, a few trips to Brazil. I started this site because the maintenance advice online was either vague or wrong, and I got tired of watching riders show up with gear that should have been retired two seasons ago. I fix what other people ignore.