Hey guys.
A slow leak is one of those problems that sneaks up on you. You pump up, everything feels fine. Twenty minutes into your session the leading edge starts going soft. You nurse it back to the beach, pump it up again, and start wondering what’s going on.
Ninety percent of the time — it’s a pinhole. And repairing a pinhole leak in a kite bladder is one of the most straightforward fixes in kitesurfing once you know the process.
The patch itself takes ten minutes. Finding the leak properly and letting it cure fully is what separates a repair that lasts one session from one that holds for years. This guide covers all of it.
Note: This post contains affiliate links. Full Disclosure.
Is It Actually a Pinhole Leak?
Repairing a pinhole leak in a kite bladder starts with confirming that’s what you’re actually dealing with. A pinhole behaves differently from a valve failure or a seam tear — and the fix is different.
Pinhole leak signs:
- Slow air loss over 30 minutes to several hours
- No audible hissing from the valve
- Kite goes slightly soft but doesn’t fully collapse
- Pressure loss is consistent session to session
Not a pinhole if:
- The kite deflates rapidly — that’s a valve failure or major seam tear
- You can hear hissing at the valve base — that’s a valve seal problem, covered in the leaking kite valve guide
- The leading edge has visible damage from an impact
Confirmed it’s a pinhole? Good. Here’s exactly how to fix it.
What You Need
Repairing a pinhole leak in a kite bladder requires basic materials — nothing exotic. Most of this should already be in your repair kit.
- Tear-Aid Type A — the right patch for kite bladder material
- Rubbing alcohol / isopropyl — surface prep
- Spray bottle with soapy water — for finding the leak
- Bucket or bathtub — submersion test
- Clean cloth or paper towel
- Permanent marker
- Sharp scissors
One note on the patch material: Tear-Aid Type A is for fabric and bladder material. Type B is for vinyl. Using Type B on a kite bladder is one of the most common mistakes — it won’t bond correctly. Type A only.
Step 1 — Confirm the Leak Location
This is the step most riders rush — and it’s the most important one. Patching the wrong spot, or patching without knowing the exact location, means doing the job twice.
Inflate the bladder fully and leave it for 30–60 minutes. Check which section loses pressure — leading edge, or a specific strut. This tells you which bladder to pull.
Then use the submersion test. Inflate the bladder lightly after removing it from the kite, submerge it section by section in a bucket or bathtub, and watch for bubbles. Even a single small bubble trail is enough to locate a pinhole.
Mark it immediately with a permanent marker — a circle around the leak, clearly visible. Once the bladder is wet and you’re moving it around, the pinhole disappears visually. The marker is what you come back to.
If the submersion test shows nothing — try the soapy water spray method instead. Inflate lightly, spray along the bladder surface, and watch for tiny bubbles forming. This works better for very slow leaks that don’t show up easily underwater.
Step 2 — Remove the Bladder
Patience here. Rushed bladder removal is how you create new problems.
Deflate completely first. Open all valves and squeeze out remaining air. Roll gently toward the valve to clear the last air out.
Extract slowly. The bladder connects internally — untie or disconnect any internal strut hose connections before pulling. Mark the orientation of the bladder (top/bottom, which end faces which direction) with your marker before removal. Reinstalling a twisted bladder is a common mistake that causes new leaks at the stress points.
Step 3 — Clean and Dry the Repair Area
The repair will hold for years or fail within a session. That outcome is determined almost entirely by this step.
Let the bladder dry completely. Any moisture under the patch and the adhesive won’t bond. If you’ve just done the submersion test, give it at least an hour at room temperature. Overnight is better.
Wipe the area around the leak with isopropyl alcohol. At least 3–4cm in every direction from the pinhole. Let it evaporate fully — about 60 seconds. Don’t touch the cleaned area with bare fingers after this. Skin oils contaminate the surface and kill adhesion.
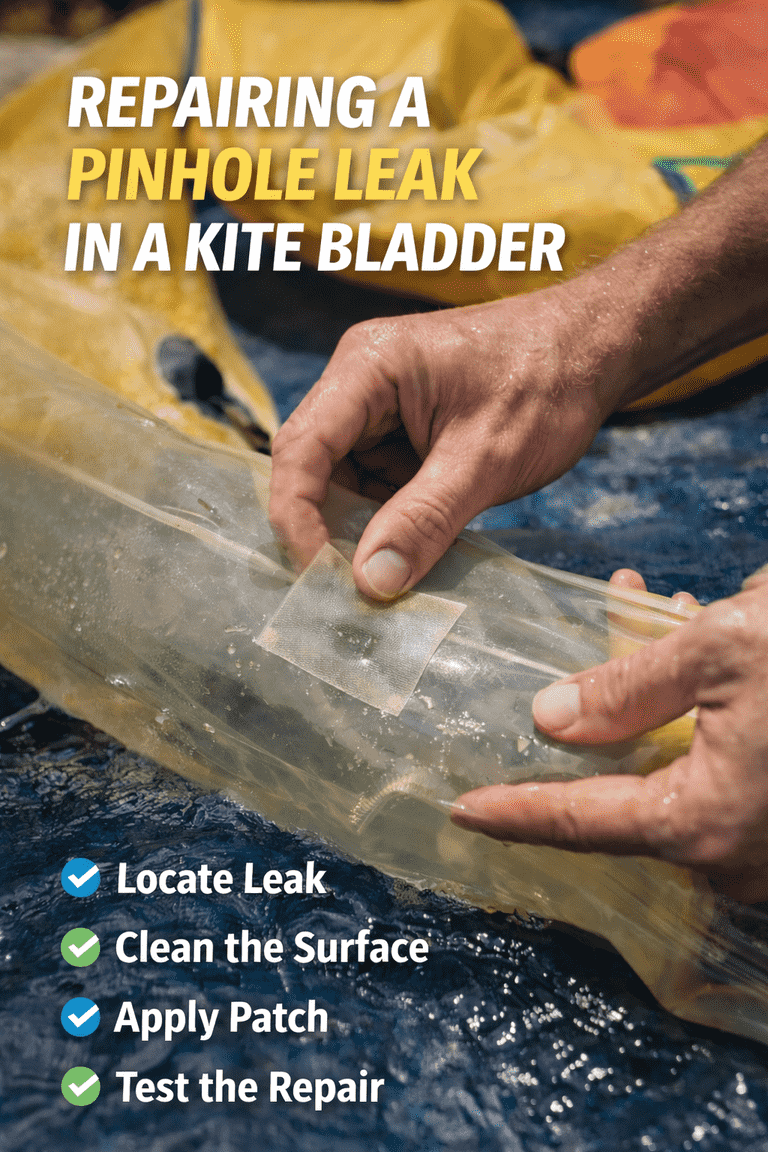
Step 4 — Cut and Apply the Patch
Cut a rounded patch — at least 2–3cm larger than the pinhole in every direction. Rounded corners are non-negotiable. Sharp corners peel first and the whole patch follows. This single habit extends the life of every repair you do.
Apply from the center outward. Peel the Tear-Aid backing slowly — it’s fiddly. Start the application over the pinhole and press outward toward the edges to avoid air bubbles underneath. Work your thumb firmly along the entire patch once it’s down, especially the edges.
A hairdryer on low heat from about 15cm away for 30 seconds activates the adhesive and significantly improves bond strength. Don’t stretch the patch as you apply it — tension causes it to want to peel back.
Step 5 — Cure Time
The most skipped step. The most important step.
Give the patch a minimum of 2 hours before reinflating. Overnight is better. The adhesive continues to bond during this time — cutting it short is the most common reason kite bladder repairs fail early.
Don’t leave the bladder in a hot car or in direct sun during curing. Heat stresses the material and weakens the bond before it’s fully set.
Step 6 — Reinstall the Bladder
Use your orientation marks. Insert slowly with the bladder slightly inflated — this prevents sharp folds that create stress points. Massage it into place rather than forcing it. Reconnect any internal strut hose connections carefully before sealing the leading edge.
A twisted bladder is invisible from outside but creates uneven pressure distribution and puts stress on the seam in the wrong places. Take the extra two minutes to get it right.
Step 7 — Pressure Test
Inflate fully and leave the kite for several hours. Check firmness at the start and again after 2–3 hours. If it’s held pressure — your kite bladder repair is done.
If it’s still losing pressure slowly:
- Check the valve area with soapy water — the slow leak might actually be a valve seal issue
- Check the patch edges — if one is lifting, deflate, press down firmly, apply heat, and give it more cure time
- Re-do the submersion test — there may be a second pinhole nearby
Run through the maintenance calendar after any bladder repair — it’s worth checking the rest of the kite while you have it fully inflated and paying attention.
Common Mistakes
These are the ones I see most often.
Using the wrong patch material. Tear-Aid Type B won’t bond correctly to kite bladder material. Type A only. This mistake accounts for a lot of “my repair failed after one session” stories.
Not finding the exact leak location first. Patching a general area and hoping you got it — this wastes time and tape. The submersion test takes five minutes and tells you exactly where to patch.
Patching on a wet or damp bladder. The adhesive bonds to moisture instead of the bladder material. Fully dry, always.
Rushing reinflation. Two hours minimum. Overnight if you can. There’s no shortcut here.
Reinstalling a twisted bladder. Mark the orientation before removal. Saves a lot of frustration on reinstall.
When to Replace Instead of Repair
Repairing a pinhole leak in a kite bladder makes sense when the damage is isolated. Consider replacement when:
- Multiple pinholes appear across the same bladder — the material is fatiguing
- The bladder material feels brittle or crinkly — it’s breaking down from UV or heat exposure
- The valve base is separating from the bladder — that’s a different repair, covered in the valve guide
- You’ve patched the same spot twice and it keeps failing — the material around the hole is compromised
A replacement bladder from your kite brand costs a fraction of a new kite. If the bladder is beyond patching — replace it.
Quick FAQ
Can I repair a kite bladder without removing it?
For a tiny leak very close to the valve or zip opening — sometimes. For anything further in, removal is the only way to clean and patch properly. A patch applied through the opening without proper surface prep is a temporary fix at best.
How long does a kite bladder patch last?
Done correctly — years. I’ve got bladders with three-season-old Tear-Aid patches that are still holding pressure perfectly. The key is clean prep and full cure time before flying.
What’s the difference between Tear-Aid Type A and Type B?
Type A is for fabric and flexible materials — kite bladders, canopies. Type B is for vinyl and clear materials. Using Type B on a bladder won’t bond correctly long-term. Type A only for this repair.
My kite bladder keeps getting pinholes in the same area — why?
Usually one of three things: the bladder is rubbing against something sharp inside the leading edge casing (a shell fragment, a bit of grit that got in), the material is fatiguing in a high-flex area, or incorrect kite folding is creating a stress crease that eventually breaks down the material. Check the inside of the leading edge casing for foreign objects before reinstalling.
Can heat cause bladder pinholes?
Yes. Overinflation combined with heat — leaving a pumped-up kite in a hot car especially — puts extreme stress on the bladder material and can cause stress failures that look like pinholes. Never leave your kite inflated in direct sun or a hot car.
Found my first bladder pinhole in a parking lot in Eilat. Spent twenty minutes trying to figure out why the kite was soft. Pump. Wait. Soft again. Eventually ran the submersion test in a beach shower and found it — tiny bubble stream from a single point.
Ten-minute fix. Four years later that patch is still holding.
Clean it, patch it, cure it. That’s all repairing a pinhole leak in a kite bladder takes.
For everything else repairs-related — the complete repairs guide has you covered.
Ride hard. 🤙
Fixed a kite bladder with a technique I didn’t cover? Drop it in the comments.

I’ve been riding since 2009 — mostly Red Sea and Mediterranean, a season in Tarifa, a few trips to Brazil. I started this site because the maintenance advice online was either vague or wrong, and I got tired of watching riders show up with gear that should have been retired two seasons ago. I fix what other people ignore.