Mastering a kitesurfing self rescue guide is the most essential skill for any technical specialist. Whether you are dealing with a line snap or a sudden wind drop, knowing the emergency pack-down procedure ensures you can return to shore safely. This 5-step technical protocol breaks down the physics of the primary quick release and the figure-8 line wrap to turn your kite into a reliable rescue craft.
In this 2026 safety update, we analyze how to manage your flagging line and maintain leading edge buoyancy in deep water. If you follow this step-by-step kitesurfing self rescue guide, you will reduce panic and maximize your chances of a successful shore-side recovery. This post is part of the complete kitesurfing safety guide.
1. The “Safety Release” and the Single Line Flag
The moment you realize you can’t relaunch, you must activate your primary quick release (QR).
- The Physics: By releasing the chicken loop, the kite shifts its entire load onto one “flag” line. This kills the lift and forces the kite into a “dead” position on the water.
- Specialist Tip: Do not hesitate. Trying to “save” the kite in a death-loop often leads to tangles that make a self-rescue impossible.
- Before heading out: Ensure your bar is dialed. A jammed safety line can ruin a rescue. See our Bar Tuning Guide.
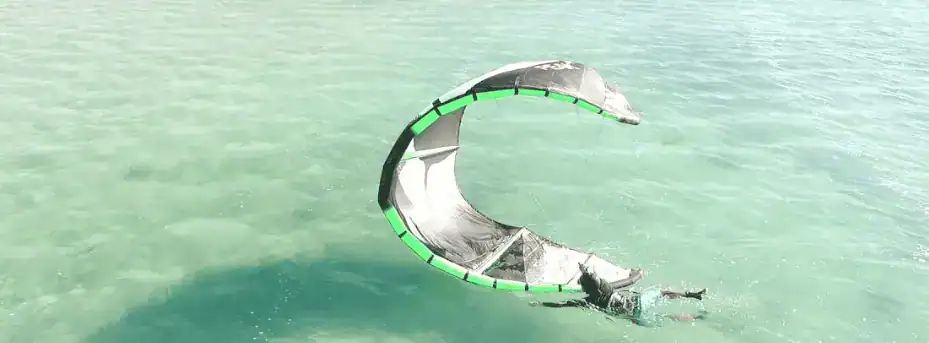
2. Winding the Lines (The “Safe-Zone” Method)
The biggest danger in a self-rescue is becoming entangled in your own lines while in the water.
- The Technique: Work your way up the “flag” line until you reach the bar. Do not wrap the line around your fingers or hand. Use a Figure-8 wrap around the bar ends.
- Tension Management: Ensure the other three lines are kept slack until the kite is within reach.
3. Securing the “Wing” (The Bridle Hitch)
Once you reach the kite, you need to secure your bar so it doesn’t float away or create a “sinker” that drags you down.
- The Hitch: Take a loop of your line and hitch it over the wingtip or through the bridle attachment. This keeps your “engine” (the kite) attached to your “rudder” (the bar).
4. Building the “Rescue Raft”
Your kite is a massive buoyancy device.
- Positioning: Flip the kite so the leading edge is facing the sky.
- The “Nautical” Position: Lay across the strut (the center rib). By grabbing the bridles or the wingtip, you can use the kite as a sail to move across the wind toward the shore.
5. The “Sail” Technique vs. The “Pack-Down”
- In Onshore Wind: Keep the kite inflated and use it as a sail. It will drag you to the beach faster than you can swim.
- In Offshore Wind: This is the nightmare scenario. You must deflate the leading edge (only slightly), roll the kite up, and use it as a flotation device while you swim perpendicular to the wind.
Specialist Safety Note: While this guide follows the technical for deep-water recovery, nothing replaces live practice. We recommend performing a “dry run” in light winds and shallow water before you actually need these skills in an emergency. (IKO Standards)
The Specialist’s Pre-Session Safety Checklist
Before you even hit the water, run through these five technical checks. Prevention is the best self-rescue.
- Quick Release (QR) Function: Does your primary release slide freely, or is it jammed with salt and sand? Rinse it in fresh water every session.
- Safety Line Integrity: Check the “Flag Line” (the one your safety leash attaches to) for fraying. This line takes 100% of the load during a self-rescue.
- Bridle Pulleys: Ensure your pulleys are spinning. If a pulley jams, the kite might not “flag out” flat, leading to a dangerous “death loop” even after you release.
- Bladder Pressure: A soft kite is a terrible rescue raft. Ensure your leading edge is pumped to the manufacturer’s recommended PSI (usually 6-9 PSI) to maintain structural rigidity in the waves.
- Line Tangles: Even a small “bird’s nest” or knot in your lines can prevent the kite from flagging out correctly.
Final Thoughts on Your Kitesurfing Self Rescue Guide
Staying calm is the secret to a successful self-rescue. Practice this protocol often so it becomes second nature
For the full safety framework this guide is part of, see the complete kitesurfing safety guide.
Ride Hard!

I’ve been riding since 2009 — mostly Red Sea and Mediterranean, a season in Tarifa, a few trips to Brazil. I started this site because the maintenance advice online was either vague or wrong, and I got tired of watching riders show up with gear that should have been retired two seasons ago. I fix what other people ignore.