Hey guys.
Learning to read waves kitesurfing is one of those skills most people develop slowly and painfully — through sessions that went wrong rather than through anything they were taught. I’ve pulled riders out of currents more than once. Not because they were inexperienced — because they didn’t read the water before they got in it.
This guide covers what to look for. Waves, rip currents, tidal flow, shore break. The stuff the forecast apps don’t tell you.
Note: This post contains affiliate links. Full Disclosure.
Start on the Beach — Before You Touch Your Gear
Before you rig anything, spend five minutes watching the water. Not a glance — actually watch it. Where are the waves breaking? Is there a pattern to the breaks or is it messy and inconsistent? Is the water surface moving in a direction you didn’t expect? Are there areas where the water looks darker, calmer, or different from the rest?
Most riders arrive at the beach, check the wind speed, and rig. The wind check is not enough. The sea has its own conditions that are completely independent of the wind — currents, tide state, swell direction, shore break — and they change the risk picture for everything that can go wrong during your session.
If conditions are new to you, ask a local rider before you launch. Every spot has patterns that don’t show up in a forecast. A regular who’s ridden there for years can tell you in two minutes what the current does at low tide, where the rip runs, and whether that shore break is manageable or a problem. That conversation takes less time than a bad launch.
Read Waves Kitesurfing
Waves affect three things for kitesurfers: your launch and land, your riding zone, and your self-rescue options if something goes wrong.
Shore break is the first thing to assess. Shore break is the wave that breaks right on the beach — and for a kitesurfer it’s the moment of maximum vulnerability. You’re entering or leaving the water with a kite in the air and limited ability to respond quickly to a breaking wave. Moderate shore break is manageable with experience. Steep, powerful shore break — waves that dump hard and close out — is dangerous for anyone and should change your launch/land plan.
Wave sets and lulls. Waves don’t arrive at perfectly even intervals. They come in sets — groups of larger waves separated by calmer periods. Before you launch, watch for the pattern. How long are the lulls between sets? A 60-second lull gives you a decent window to get out. A 10-second lull doesn’t. Timing your launch into a lull is basic wave reading — and it’s something beginners almost never do because nobody tells them to look for it.
Where waves are breaking and why. Waves break in shallow water — over sandbars, reefs, rocks. Where you see consistent breaking you have shallow water underneath. This matters for body drag sessions — dragging upwind in shallow water over a reef that’s invisible at high tide is a real hazard. At low tide the same reef might be obvious. Know what’s under the surface of your riding zone.
Wave direction vs wind direction. Waves and wind don’t always come from the same place. Swell travels huge distances — the waves at your spot today might be generated by a storm system 1,000 kilometres away. If swell and wind are from very different directions, conditions can be more complex and unpredictable than either alone would suggest. The water will be choppier, the pattern less readable. If you’re not experienced in mixed conditions, that’s a day to scale back expectations.
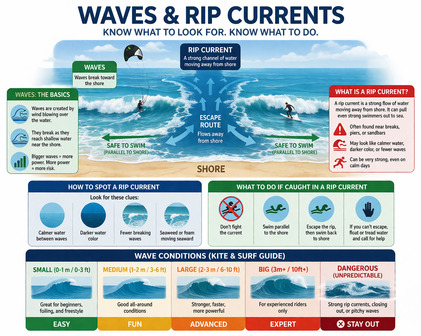
Rip Currents — The One That Gets People
I’ve helped more riders out of rip currents than I can accurately count. The consistent thing about every one of those situations: they didn’t know the rip was there before they got in.
A rip current is a channel of water moving away from shore — fast. According to NOAA’s rip current research, rip currents can move at speeds up to 2.5 metres per second — faster than any swimmer. For a kitesurfer who’s lost their kite or is body dragging, a rip current running against your direction of travel can cancel out all the progress you’re making and push you offshore no matter how hard you work.
How to spot a rip from the beach: Look for a gap in the line of breaking waves — a patch where waves aren’t breaking surrounded by areas where they are. That calm-looking gap is often a rip. The water there is deeper because the current has carved a channel — waves can’t break in it. It can look deceptively calm and inviting compared to the breaking water on either side.
Also look for discoloured water — slightly murkier or brownish — moving away from the beach. Rips carry sand and sediment offshore. A line of foam or seaweed moving consistently away from shore is another sign.
If you’re not sure — get higher. It’s much easier to spot rips from a dune or elevated car park than from the water’s edge. Spend the extra minute.
What to do if you’re caught in one while body dragging: Don’t fight it directly. A rip runs offshore in a relatively narrow channel. Move laterally — parallel to the beach — until you’re out of it, then work your way back in. Use the kite to drag yourself sideways out of the current rather than directly against it. This is exactly the situation where solid body drag technique matters most — the body drag guide and self-rescue guide both cover the technique for managing difficult water situations.
Tidal Currents — The Slow One That Still Gets You
Rip currents are fast and dramatic. Tidal currents are slow and insidious — and in my experience they catch experienced riders as often as beginners because they build gradually and riders don’t notice until they’re significantly further along the beach than they intended.
Tidal current runs along the beach — longshore — driven by the tide moving in or out through the coastal geography. At some spots it barely exists. At tidal spots, it can run at walking pace or faster. A rider who launches upwind of their exit point in a strong tidal current will find themselves a long walk from where they started by the end of the session. In stronger tidal flow, body dragging or self-rescuing against the current is a serious physical challenge.
Before every session at a tidal spot: Check the tide state and which direction the current runs. Ask locals if you don’t know. Launch with the current running against you if possible — so that as you tire during the session, the current is helping you back toward your start point rather than pushing you further away. A handheld anemometer gives you wind data at the beach — pair that with knowing the tide and you have a much more complete conditions picture before you launch.
Shore Break — The Underestimated One
Shore break deserves its own mention because it’s where a lot of kitesurfing injuries actually happen — not out on the water, but at the moment of entering or exiting.
A wave breaking on top of you while you’re launching is a problem. A wave breaking behind you while you’re trying to land is a problem. A dumping wave — one that pitches forward and breaks hard onto a shallow bottom — can knock you off your feet and into your board, or into the person trying to help you land.
The risk varies enormously by tide state. A beach that has gentle shore break at high tide can have a steep, dumping break at low tide when the water is shallower and waves are hitting harder bottom. Check the shore break at the state of tide you’re planning to launch in — not at a different stage.
If conditions look borderline, launch from a calmer section of the beach even if it means walking further. The extra 10 minutes is worth it. The offshore wind kitesurfing guide covers the broader picture of reading conditions before you launch — reading waves is part of the same habit.
Building the Habit
The real skill in reading waves kitesurfing isn’t knowing any single technique — it’s building the habit of actually looking before every session. Not at the wind alone. At the whole picture. Waves, current, tide, shore break, where things are breaking and why.
Riders who do this for long enough develop a feel for it that’s almost automatic. They arrive at a new spot and within a few minutes of watching they have a working model of what the water is doing. That model is the difference between a session where everything is understood and one where conditions surprise you.
The kitesurfing weather guide covers the full pre-session conditions check — wave reading slots into that routine alongside wind and weather. And the kitesurfing safety pillar pulls it all together. Wear a wetsuit appropriate for your water temperature — cold water drains energy faster and compromised energy means compromised decision making in exactly the situations where currents and shore break matter most.
FAQs
How do you read waves for kitesurfing?
Watch the water from the beach for at least five minutes before rigging. Look for where waves are breaking and why — shallow water, sandbars, reefs. Identify gaps in the breaking waves that could be rip currents. Watch the tidal flow direction. Assess the shore break at the current tide state. Ask a local if you’re at a new spot.
What is a rip current and how does it affect kitesurfing?
A rip current is a fast-moving channel of water running away from shore. For kitesurfers it’s dangerous during body drag and self-rescue — the current can cancel your upwind progress and push you offshore. Spot it from the beach by looking for gaps in breaking waves where the water looks calmer and possibly discoloured. If caught in one, move laterally parallel to the beach to exit the channel rather than fighting it directly.
How do tidal currents affect kitesurfing?
Tidal currents run along the beach and can push you significantly downwind of your launch point during a session. At strong tidal spots, body dragging or self-rescuing against the current is a real physical challenge. Check the tide direction before launching and position yourself so the current works with you, not against you, as the session progresses.
What is shore break and why does it matter for kitesurfing?
Shore break is the wave that breaks directly on the beach. It’s most dangerous during launch and landing — the moments when you have limited ability to respond quickly. Steep, dumping shore break can knock you down and into your board. It varies significantly with tide state — check it at the state of tide you’re planning to launch in, not at a different time.
How do I spot a rip current from the beach?
Look for a gap in the line of breaking waves — an area where waves aren’t breaking surrounded by areas where they are. The water may look slightly darker, calmer, or murkier than surrounding areas. Foam or seaweed moving consistently offshore is another sign. Always easier to see from an elevated position like a dune or car park than from the water’s edge.
Should I ask locals about wave conditions at a new spot?
Always. Every spot has specific patterns — where the rip runs, what the current does at different tide states, where the shore break is worst — that don’t appear in any forecast. A two-minute conversation with a regular rider at the spot can give you information that takes a season to learn otherwise.
What’s the trickiest condition you’ve encountered reading the water at a new spot? Drop it in the comments — local knowledge shared here helps everyone.
Ride hard. 🤙

I’ve been riding since 2009 — mostly Red Sea and Mediterranean, a season in Tarifa, a few trips to Brazil. I started this site because the maintenance advice online was either vague or wrong, and I got tired of watching riders show up with gear that should have been retired two seasons ago. I fix what other people ignore.