Hey guys.
Had a session last week where my kite felt completely wrong. Sluggish turns, weird bar pressure, back-stalling on the depower. Checked my lines — fine. Checked my bar setup — fine.
Bridle was two knots off from where it should have been. Two knots. Twenty seconds to fix on the beach. Cost me half a session figuring it out.
That’s the thing about kite bridle tuning — most riders never touch it, never learn it, and spend years riding a kite that’s slightly fighting them without knowing why. The kite gets blamed. The conditions get blamed. The bar gets blamed.
Meanwhile the bridle is sitting there with the answer.
If your kite feels weak after checking the bar and lines, the bridle is the next place to look.
Note: This post contains affiliate links. Full Disclosure.
What Is a Kite Bridle and What Does It Actually Do?
Quick clarification first — “bridle” means different things to different people so let’s make sure we’re on the same page.
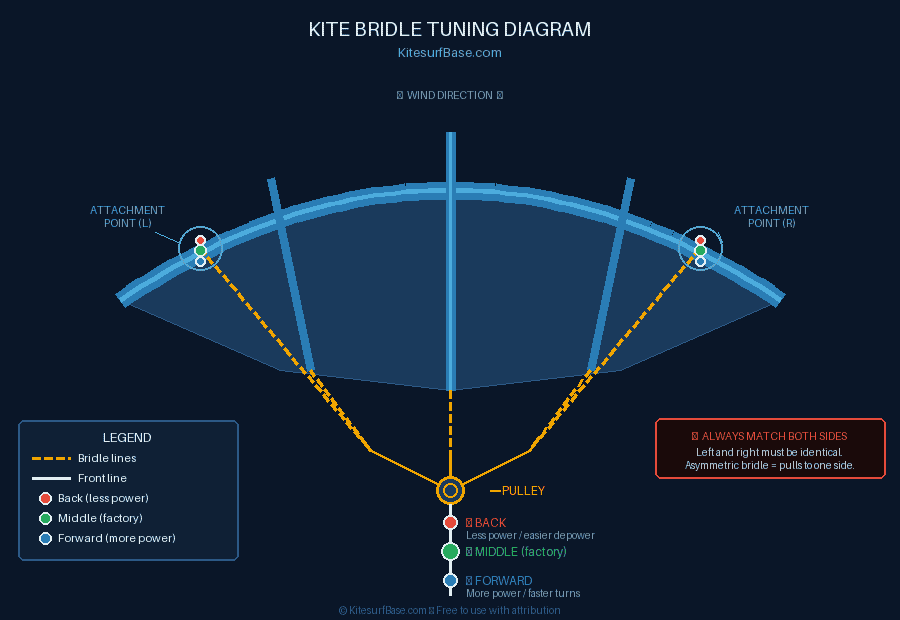
The bridle is the system of lines and attachment points that connects your kite’s front lines to the kite itself. On a modern LEI (Leading Edge Inflatable) kite, this is the network of cords running along the leading edge and down the struts, ending at a central attachment point where your front lines connect via a pulley or fixed point.
The bridle controls three fundamental things:
Angle of Attack — how the kite faces into the wind. Move the bridle forward and the kite presents more face to the wind, generating more power. Move it back and the kite de-powers and becomes more efficient but generates less raw pull.
Turning Speed — how quickly the kite responds to bar input. Bridle position affects the moment arm of your back lines, which directly changes how snappy or slow the kite feels when you steer.
Depower Range — how much the kite de-powers when you push the bar away. Bridle setup affects the full range of power from full bar-in to full bar-out.
Every time you fly your kite, the bridle is doing all three of these things simultaneously. And every time you change the bridle setting — even by one knot — all three change together.
That’s why kite bridle tuning matters. And that’s why getting it wrong in one direction can make a kite feel unresponsive, while getting it wrong in the other direction makes it feel overpowered and twitchy.
The Different Types of Bridle Systems
Not all bridles are the same — and knowing which system your kite uses changes how you approach bridle tuning kitesurfing style.
Fixed Bridle
The simplest system. The front lines attach directly to fixed points on the kite with no pulley. Adjustment is done by moving the knot connection point — usually there are two or three knot options at each attachment point.
Common on older kites and some modern all-round designs. Less tuning range but more reliable and simpler to maintain.
Pulley Bridle
The most common system on modern LEI kites. The front lines run through a pulley on the bridle, which allows the kite to shift its angle of attack dynamically as you push and pull the bar. This is what gives modern kites their wide depower range.
The pulley position can usually be adjusted by moving the pigtail connection point between knots. This is your primary kite bridle adjustment point on most modern kites.
Y-Bridle (or Split Bridle)
Used on some high-performance and bow kite designs. The front line splits into two attachment points — one at the leading edge and one further back. Gives a wider depower range but is more complex to adjust.
If your kite has a Y-bridle, the adjustment principle is the same but you have two points to adjust instead of one. Always adjust both sides equally.
What Brand Is Your Kite?
Every brand does this slightly differently. Before you touch anything, find your kite’s tuning guide. F-One, Duotone and North publish these online for every model. If yours isn’t online, your nearest IKO dealer will have it. Don’t adjust blind.
Reading the Symptoms — What Your Kite Is Telling You
This is where kite bridle tuning becomes practical. Your kite tells you when the bridle needs adjusting — you just need to know how to read the signs.
Here’s the diagnostic table I use:
| Symptom | What It Means | Bridle Adjustment Direction |
|---|---|---|
| Kite back-stalls, falls backward | Angle of attack too low — kite presenting too little face to wind | Move bridle connection forward (more power) |
| Kite feels overpowered, hard to depower | Angle of attack too high — kite presenting too much face | Move bridle connection back (less power) |
| Turning feels slow and sluggish | Back lines effectively too long relative to front | Move bridle forward OR shorten back lines |
| Kite turns too twitchy, oversteers | Back lines effectively too short relative to front | Move bridle back OR lengthen back lines |
| Kite won’t fully depower | Bridle set too far forward, reducing bar travel range | Move bridle connection back |
| Kite loses power too early on bar out | Bridle set too far back, depowering before full bar travel | Move bridle connection forward |
The symptoms in the first column are what you feel on the water. The adjustment in the third column is what you do on the beach before the next session.
One important thing — always check your bar and line tuning first before touching the bridle. Many of the symptoms above can also be caused by unequal line lengths or a depower system that needs adjustment. Bridle adjustment is the next step if the bar check comes back clean.
How to Tune Kite Bridles — Step by Step
Right. Here’s the actual process. This is how to tune kite bridles properly — not guesswork, not trial-and-error in the water. Methodical, on the ground, before you launch.
What You’ll Need
- Your kite, bar, and lines
- A clean flat area — a lawn or empty car park
- Your kite’s tuning documentation (download it if you don’t have it)
- 20 minutes
- A phone to photograph your starting position before you change anything
Step 1 — Photograph Your Current Setup
Before you touch anything, take a clear photo of your bridle attachment points on both sides of the kite. Show the knot positions, the pigtail connections, and any adjustment markings on the bridle.
This is your reference point. If you make an adjustment and hate the result, this photo is how you get back to where you started. I’ve seen riders spend an hour trying to remember where they started because they skipped this step. Don’t skip it.
Step 2 — Lay the Kite Out and Check Both Sides
Inflate the kite and lay it flat. Check that both sides of the bridle are set identically — same knot position, same pigtail length, same pulley position. An asymmetric bridle is the fastest way to a kite that pulls to one side.
If they’re not identical, make them identical before you do anything else. This alone fixes a surprisingly common problem.
Step 3 — Identify Your Adjustment Points
On most modern kites, the bridle adjustment points are the pigtail connection knots near the leading edge attachment. There are usually 2-3 knots offering different positions. The manufacturer labels these — often as “+” for more power and “-” for less, or with specific wind range recommendations.
Find these knots on both sides of the kite. They’re usually tucked under the leading edge or along the strut junction. Some are obvious. Some are really well hidden — check your manual if you can’t find them.
Step 4 — Make One Adjustment at a Time
This is the most important rule in kite bridle tuning. Change one thing. Test it. Evaluate. Then decide if you need another change.
Moving two things at once makes it impossible to know which change caused which effect. Riders who make multiple simultaneous adjustments end up confused about what they changed and why.
One knot position change at a time. One session of testing per change. That’s the process.
Step 5 — Make the Adjustment
Move the pigtail connection to the new knot position. Do it on both sides simultaneously — same knot, same position, both sides. Even one knot difference between left and right will make the kite fly asymmetrically.
The adjustment is simple:
- Unhook the pigtail loop from the current knot
- Hook it onto the target knot
- Make sure it’s seated properly and not just resting loosely
Take another photo showing the new position.
Step 6 — Do a Ground Check Before Flying
With the kite inflated and the adjustment made, do a quick visual check:
- Both sides identical ✅
- All pigtail connections secure ✅
- Pulley running freely (give it a spin with your finger) ✅
- No bridle lines twisted or crossed ✅
Then lay your lines out and do your normal pre-launch check. The kite maintenance calendar has the full pre-session check sequence — run through it as normal.
Step 7 — Test in Moderate Conditions
Your first session with a bridle adjustment should be in moderate, familiar conditions — not maxed out, not light and patchy. You want consistent, representative wind so you can actually feel the difference.
Fly the kite for 20-30 minutes before you form an opinion. Initial impressions can be misleading as you adjust to the change. After 30 minutes you’ll have a much clearer sense of whether the adjustment improved things or not.
Step 8 — Evaluate and Decide
After the session, honestly assess what changed:
- Did the symptom you were trying to fix improve?
- Did anything else get worse?
- Does the kite feel more or less like what you want?
If the adjustment helped — you’re done. If it helped but not enough — go one more knot in the same direction next session. If it made things worse — go back to your starting position (you have the photo) and try the other direction.
Bridle Tuning for Different Conditions
One thing most kite bridle guides don’t mention — bridle position isn’t just a “set it and forget it” adjustment. Some riders adjust their bridle for different wind conditions.
Light wind (under 12 knots) Move the bridle slightly forward — more power, more angle of attack, the kite generates more pull from less wind. Helps with water starts and riding in marginal conditions.
Strong wind (25 knots+) Move the bridle slightly back — less angle of attack, easier to depower, the kite becomes more manageable in the upper wind range. Combined with a smaller kite, a back-positioned bridle makes overpowered conditions more controllable.
Freestyle and jumping Most freestyle riders prefer a slightly more forward bridle setting — more direct power delivery, snappier turning, better loop response. Understanding the wind window helps here — a more forward bridle makes the power zone feel more immediate and responsive.
Wave riding Wave riders often prefer a slightly back bridle setting — more depower range, lighter bar pressure, the kite feels less like it’s trying to pull you and more like it’s just floating above you. Easier to manage kite position while focusing on the wave.
These are starting points, not rules. Every rider’s preference is different and every kite model responds differently to bridle changes. The only way to know what works for you is to try it methodically.
Bridle Maintenance — What to Check and When
Kite bridle adjustment isn’t just about performance — it’s also about safety. The bridle is a structural part of your kite’s flying system and it degrades like everything else.
What to inspect monthly:
Bridle lines — run your fingers along every bridle line feeling for fraying, fuzzing, or stiffness. Bridle lines are thinner than your main flying lines and can wear faster, especially at pulley contact points. If you find significant wear, the bridle needs replacing before you fly — not after.
Pulleys — spin each pulley with your finger. It should rotate freely and smoothly. A jammed or gritty pulley creates uneven load on the bridle lines and can cause asymmetric flying behaviour. Rinse pulleys with fresh water after every session and replace them when they stop spinning freely.
Pigtail connections — the short loops that connect your lines to the bridle attachment knots. Check for fraying at the knot points — this is where the most wear concentrates. If a pigtail looks thin or fuzzy at the knot, replace it.
Knot integrity — check that all bridle knots are tight and haven’t shifted. A slipping knot on a bridle line is a rare but real problem that can change your kite’s flying characteristics suddenly.
All of this is covered in the monthly inspection section of the kite maintenance calendar. If you’re not doing monthly checks — start. Catching a worn bridle line on the beach is infinitely better than finding out about it on the water.
Kite Bridle Setup After a New Kite Purchase
If you’ve just bought a new kite — new or second hand — here’s the bridle setup process before your first session.
New kite from a shop: Most new kites come set to the manufacturer’s recommended middle position. This is a safe starting point for most riders in most conditions. Fly it as-is for a few sessions to get a feel for the kite’s baseline behaviour before you start experimenting with adjustments.
Second hand kite: Check where the previous owner had the bridle set and compare it to the manufacturer’s recommended position. If it’s significantly different from the middle setting — find out why before you fly it. The previous owner may have had a good reason. Or they may have made a random change and never got around to reversing it.
Reset to the manufacturer’s middle position, fly it, then adjust from there based on your own experience.
After any repair: If you’ve had the kite canopy repaired, bladder replaced, or any work done that involved the bridle — check every bridle attachment point and knot before you fly. Workshop repairs occasionally disturb bridle settings, especially on repairs near the leading edge or strut junctions.
Common Bridle Tuning Mistakes
Adjusting both bridle and bar simultaneously If you change bridle position and bar settings in the same session you won’t know which change caused which result. Fix one system at a time.
Making large adjustments Moving two or three knot positions at once on a bridle is a big change. The kite will fly noticeably differently and it’s easy to overcorrect. One knot position per session. Incremental changes.
Not checking both sides An asymmetric bridle — different settings left and right — creates a kite that flies off-centre. Always adjust both sides to the same position. Always check both sides before flying.
Tuning in the wrong conditions Testing a bridle adjustment in gusty, inconsistent wind gives you unreliable feedback. You can’t tell if the kite feels different because of the adjustment or because the wind is all over the place. Test in steady, moderate conditions.
Ignoring the pulley A jammed pulley effectively changes your bridle geometry without you touching anything. If your kite suddenly starts flying differently and you haven’t adjusted anything — check the pulley first before you start changing knot positions.
Skipping the photo Already mentioned but worth repeating. Take a photo of your starting position before every adjustment. You will need it eventually.
Quick FAQ
Q: What does adjusting the bridle actually change?
The kite’s angle of attack — how much face it presents to the wind. Forward = more power, slower to depower. Back = less power, easier to manage. Turning speed and depower range shift with it.
Q: How do I know which knot position is right for me?
Start at the manufacturer’s middle position. Fly it. If the kite back-stalls — go forward one knot. If it’s hard to depower — go back one knot. One change per session. Give it 30 minutes of flying before you decide.
Q: My kite pulls to one side — is that a bridle problem?
Check your lines first. Unequal line lengths cause this more often than bridle issues. Run the bar and line check before touching the bridle. If lines are equal and both bridle sides are set identically — then yes, look at the bridle.
Q: Can I damage my kite by adjusting the bridle?
Not within the manufacturer’s specified range. Going way outside that range in strong wind is asking for trouble. Stay within the recommended knot positions and you’re fine.
Q: How often should I check my bridle?
Monthly. Lines, pulleys, pigtail connections. It’s on the maintenance calendar — takes three minutes and catches problems before they become expensive ones.
Q: My kite is old and the bridle lines look worn — should I replace them?
Yes. Worn bridle lines are not a wait-and-see situation. Fuzzing, stiffness, discolouration at the pulley points — replace before your next session. Not expensive. Not optional.
Two knots on the bridle. That’s what was wrong with my session last week.
Check yours before your next session — lay the kite out, find the attachment points, make sure both sides match, compare to the manufacturer’s middle position. Takes five minutes.
If something feels off on the water and your lines and bar check out clean — now you know where to look next.
Ride hard. 🤙
Adjusted your bridle and noticed a difference you didn’t expect? Drop it in the comments — real-world tuning experience is the best kind.

I’ve been riding since 2009 — mostly Red Sea and Mediterranean, a season in Tarifa, a few trips to Brazil. I started this site because the maintenance advice online was either vague or wrong, and I got tired of watching riders show up with gear that should have been retired two seasons ago. I fix what other people ignore.