Hey guys.
Pull out your kite bar right now and give the depower cleat a pull.
Does it slide smoothly? Or does it stick, grind, catch?
If it’s anything other than smooth — your bar needs attention. And if you’ve never cleaned it properly, I’d bet money it’s not smooth.
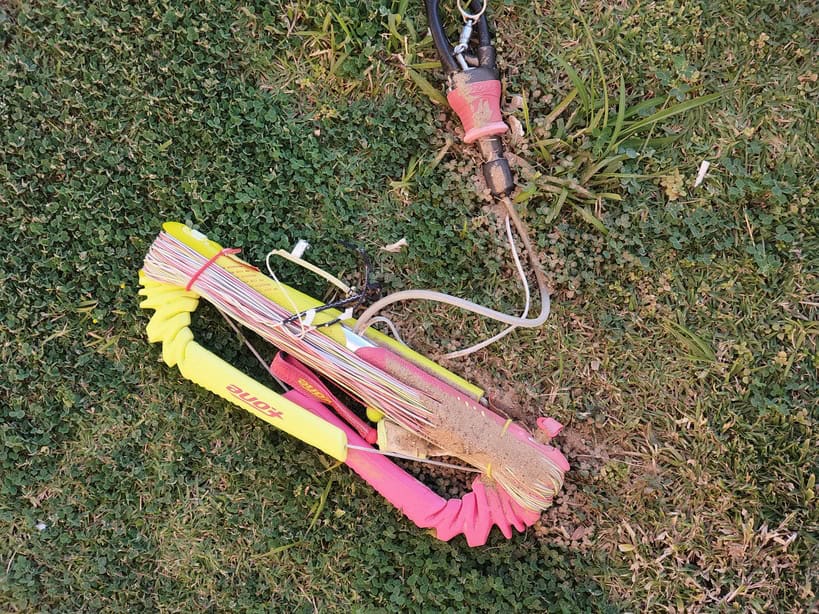
Kite bar maintenance is the most skipped job in kitesurfing. Riders rinse their kites, check their lines, inspect their bladders — and then roll the bar up with two sessions of salt and beach grit still in the depower system and wonder why it feels stiff six months later.
A neglected bar doesn’t fail dramatically. It just gets gradually worse. The depower gets stiff. The chicken loop gets sticky. The safety release gets slow. And one day on the water something doesn’t work the way it should, at the moment it really needs to.
Twenty minutes of kite bar cleaning twice a season prevents all of it.
A poorly maintained bar is the most common reason a kite feels weak — read the full diagnostic guide.
Note: This post contains affiliate links. Full Disclosure.
What Actually Damages a Kite Bar
Before we get into how to clean kite bar systems properly, it helps to understand what you’re actually fighting.
Salt crystallisation This is the main one. Every session leaves a microscopic layer of salt water on every surface. When it dries, it crystallises. Salt crystals are abrasive — they work their way into every moving part, every pulley, every cleat mechanism. Over time they grind surfaces down and make everything stiffer and less reliable.
Fine sand and grit Beach sand is essentially fine glass particles. Get it into a pulley bearing or a depower cleat and it acts like sandpaper on the internal surfaces. The grit you can’t see does more damage than the grit you can.
UV degradation The foam floats, the bar ends, the safety flag line sleeve — all of these degrade with UV exposure over time. UV makes foam brittle, weakens line sheaths, and breaks down plastic components. A bar left in the sun on a beach every session ages faster than one that’s bagged up between uses.
Corrosion The metal components — chicken loop pin, safety release mechanism, bar end fittings — are made from stainless steel or anodised aluminium. Both are corrosion resistant but neither is corrosion proof. Salt water plus time equals corrosion, especially in any area where two metal surfaces are in contact.
Line wear at contact points Where your depower line runs through the cleat, where the front lines pass through bar guides, where the safety line runs through any friction point — these are the wear zones. Salt and grit in these zones accelerates line wear significantly.
How Often Should You Do Kite Bar Maintenance
Kite bar upkeep doesn’t need to be an hour-long job every session. Think of it in three levels:
After every session — 2 minutes Rinse with fresh water. That’s it. Just a thorough rinse of the whole bar, lines, chicken loop, depower cleat, and safety release with fresh water before you roll it up. This removes the salt before it crystallises. If you only do one thing from this entire guide — make it this.
Monthly — 15 minutes Full kite bar cleaning, inspection, and lubrication. This is the proper maintenance session. Run through every component, check every moving part, lubricate what needs it, replace anything that looks worn.
End of season — 30 minutes Full strip-down inspection before long-term storage. Check everything, replace any worn components, store dry in a bag away from UV.
The kite maintenance calendar has all three of these scheduled in — if you’re not already using it, this is a good reason to start.
Tools and Products You’ll Need
Nothing specialist. Most of this is already in your kit or available from any hardware shop.
- Fresh water — obvious, but a proper rinse not just a splash
- Soft brush — an old toothbrush is perfect for getting into tight spots
- Isopropyl alcohol — for removing salt residue and degreasing before lubrication
- Silicone spray lubricant — for depower cleats, pulleys, and moving parts. NOT WD-40 — WD-40 attracts dirt and degrades certain plastics
- Dry PTFE lubricant — for the chicken loop mechanism and safety release
- Clean cloth or paper towel
- Latex gloves optional
Full kit breakdown in the kite repair kit guide if you want the complete picture.
How to Clean Kite Bar — Step by Step
Step 1 — Unroll Everything Completely
Don’t try to clean a bar that’s still rolled up. Unroll the full bar and lines, lay it out flat, and give yourself room to work. You want access to every component.
Step 2 — Rinse Thoroughly With Fresh Water
Rinse everything. Bar, lines, chicken loop, depower cleat, safety release, floats, bar ends. Use a hose or a bucket — not a trickle. You want enough water flow to actually flush salt crystals out of moving parts, not just wet the surface.
Pay particular attention to:
- The depower cleat mechanism — flush water through it repeatedly
- The chicken loop and its pin
- The safety release — flush it from both ends
- The pulley or pulleys — spin them under running water
- The bar end line guides
Give it a full two minutes of rinsing. This is the single most effective thing you can do for clean kite control bar maintenance.
Step 3 — Brush Out the Tight Spots
While everything is still wet, use an old toothbrush to scrub:
- Around the depower cleat teeth
- Around the chicken loop attachment
- Any recessed areas where sand collects
- The bar end fittings
Sand hides in corners. The brush gets it out where water alone can’t reach.
Step 4 — Rinse Again
Rinse a second time after brushing. You’ve just loosened whatever the first rinse didn’t shift — flush it away now.
Step 5 — Dry Properly
Shake out as much water as possible then lay the bar flat in a warm area to dry completely. Don’t roll it up wet — moisture trapped inside the depower mechanism is exactly what causes corrosion.
If you’re in a hurry, a hairdryer on low heat from 20cm away speeds this up. Don’t cook it — just dry it.
Step 6 — Inspect Every Component
Once dry, this is your inspection window. Go through each component systematically:
Depower cleat Pull the depower line through the cleat several times. It should move smoothly with consistent resistance. Any catching, grinding, or uneven resistance means there’s still grit in the mechanism or the cleat teeth are worn. If grit — clean again. If worn — replacement cleat time.
Chicken loop Check the pin moves freely. Check the loop itself for any cracking or deformation. Check the metal ring where the chicken loop connects to the depower line — this area takes enormous load and is worth close inspection every time.
Safety release This is the most important component on your bar. Pull it. It should release instantly and cleanly with the correct amount of force — firm enough not to trip accidentally, light enough to activate immediately in an emergency. If it’s stiff, sticky, or requires more force than it used to — clean it again and lubricate. If it’s still not right after that, replace it.
Test your safety release before every session regardless. This is non-negotiable. The self-rescue guide covers why — but the short version is a safety release that doesn’t work instantly in an emergency is as useful as not having one.
Pulleys Spin every pulley with your finger. Should rotate freely and smoothly. Any grinding, stiffness, or wobble means the bearing is contaminated or worn. A pulley that doesn’t spin freely creates uneven load on your front lines and can affect kite trim — the same symptom as unequal line lengths. Replace worn pulleys — they’re cheap.
Front line guides Check the plastic or metal guides that the front lines pass through on the bar. Look for wear grooves where the lines have cut into the material. Deep grooves mean the guides are worn and creating a friction point that will accelerate line wear. Replace them.
Bar foam floats Press the foam along the whole length. Should be firm and consistent. Any sections that feel waterlogged, compressed, or significantly softer than the rest mean the foam has absorbed water or is breaking down. Waterlogged floats reduce buoyancy — relevant if you ever drop the bar in deep water and need to retrieve it.
Lines at the bar end knots Check the line at every knot connection point — this is where wear concentrates. Any fuzzing or fraying at a knot means the line is compromised at that point. See the kite line replacement guide for the full wear assessment process.
Step 7 — Lubricate Moving Parts
Once everything is clean, dry, and inspected — lubricate.
Depower cleat — a short burst of silicone spray directly into the cleat mechanism. Pull the depower line through several times to distribute it. Wipe away any excess from the line itself — you don’t want lubricant on the line surface where it runs through your hands.
Pulleys — a drop of silicone lubricant on each pulley axle. Spin the pulley to work it in.
Chicken loop pin — a tiny amount of dry PTFE lubricant on the pin. Just enough to keep it moving freely. Don’t over-lubricate — excess lubricant attracts sand.
Safety release mechanism — a small amount of dry PTFE lubricant. Test it after lubricating. Should feel noticeably smoother if it was stiff before.
What NOT to lubricate — the lines themselves, the bar surfaces where you grip, any area that contacts your harness hook. Lubricant in these areas creates slip where you want grip.
Kite Bar Care for Different Bar Systems
The cleaning process is the same across all bars but a few brand-specific things are worth knowing.
Duotone bars The Click Bar uses a push-away safety system with a specific release mechanism. The plastic housing around the release is prone to salt build-up in the hinge area — pay extra attention to flushing this out. Duotone publish service guides for their bars — worth downloading for your specific model.
North bars The Trust Bar’s depower system uses a specific cleat design that can trap sand under the cleat body. Remove the cleat from the bar if possible during your monthly clean — there’s usually a screw or clip holding it — and clean underneath it. Reattach and test.
Older or generic bars Older bars often have simpler chicken loop and safety systems with fewer components but more metal-on-metal contact points. These benefit most from dry PTFE lubrication on the release mechanism. Check North’s or your brand’s website for any available service documentation.
What to Replace and When
Kite bar care isn’t just cleaning — knowing when to replace components is equally important.
| Component | Replace When |
|---|---|
| Depower cleat | Worn teeth, inconsistent grip, won’t hold line position |
| Chicken loop | Cracking, deformation, pin doesn’t move freely |
| Safety release | Stiff, sticky, or requires more force than originally |
| Pulleys | Won’t spin freely after cleaning, wobble on axle |
| Front line guides | Deep wear grooves visible |
| Foam floats | Waterlogged, compressed, broken down |
| Safety flag line | Any fuzzing, stiffness, or discolouration |
| Full line set | Every 2-3 seasons — full guide in kite line replacement |
Most of these components are available from your kite brand’s spare parts catalogue. A full set of replacement pulleys, a new depower cleat, and a chicken loop costs less than €50 for most bars. Compare that to the cost of a new bar — or the cost of a safety system that doesn’t work when you need it.
After-Session Kite Bar Cleaning — The 2-Minute Habit
The monthly clean is the deep service. But the daily habit is what actually keeps the bar in good condition between proper cleans.
After every single session:
- Rinse the whole bar under fresh water — 60 seconds minimum
- Pull the depower line through the cleat a few times under the rinse water — flushes salt out before it crystallises
- Activate the safety release once under the rinse — clears any salt from the mechanism
- Shake out excess water and roll up loosely — don’t roll it tight while wet
- Store in a bag — not loose in the boot of a car where it’ll bake in the sun
That’s it. Two minutes. Does more for long-term kite bar upkeep than any amount of deep cleaning after the fact.
Storage — The Part Most Riders Get Wrong
How you store your bar between sessions matters as much as how you clean it.
Never store a wet bar rolled tight. Moisture trapped in the coiled lines and inside the depower mechanism sits there between sessions breaking things down slowly.
Store away from direct sunlight. UV on the foam floats and plastic components does cumulative damage. A bag or a dark storage box is all it takes.
Don’t store under heavy gear. A bar with other equipment stacked on top of it for months can deform the foam floats and put unnecessary stress on line connections. Give it its own space.
Keep it at room temperature. Extreme cold makes plastic components brittle. Extreme heat accelerates UV degradation and can soften or warp plastic parts. A garage or storage room at normal temperature is fine. The boot of a car parked in full sun in summer is not.
Quick FAQ
How often should I clean my kite bar?
Rinse with fresh water after every session — two minutes, no excuses. Full kite bar cleaning with inspection and lubrication monthly, or every 10-15 sessions. Full strip-down before long-term storage at end of season.
Can I use WD-40 on my kite bar?
No. WD-40 is a water displacer and short-term lubricant — it’s not a long-term lubricant for precision components. It attracts dirt, degrades certain plastics and rubber compounds, and leaves a residue that gums up depower cleats. Use silicone spray for moving parts and dry PTFE for the safety mechanism.
My depower cleat is stiff and won’t slide — what do I do?
Clean it first. Flush with fresh water, brush the teeth, rinse again, dry, then spray silicone lubricant directly into the mechanism. If it’s still stiff after that — the teeth are worn or something is damaged internally. Replace the cleat. It’s a cheap part and a stiff depower system affects your kite control directly.
My safety release feels stiffer than it used to — is that dangerous?
Yes, treat it as dangerous until it’s fixed. Clean it thoroughly, lubricate with dry PTFE, and test it. If it’s still stiffer than it should be — replace the mechanism. A safety release that requires extra force to activate is a liability. You need it to work instantly.
How do I know if my pulleys need replacing?
Spin them with your finger. They should rotate freely and smoothly. Any grinding, resistance, or wobble means the bearing is contaminated or worn. Clean first — if still not right, replace. Pulleys are cheap. A worn pulley affecting your kite trim or accelerating line wear is not.
Can I service my bar myself or does it need a shop?
Everything in this guide you can do yourself. Cleaning, lubrication, inspection, and component replacement are all home jobs. The only thing worth taking to a shop is if you have a specific safety system failure you can’t diagnose — a Duotone or North dealer can service their own bar systems properly.
Pulled that depower cleat at the start of this post and it was stiff?
Now you know why. And now you know how to fix it.
Two minutes after every session. Fifteen minutes once a month. Your bar will still be working perfectly in five years while the neglected ones are getting binned after two.
Ride hard. 🤙
Got a specific bar cleaning question or a component that’s giving you trouble? Drop it in the comments.
I’ve been riding since 2009 — mostly Red Sea and Mediterranean, a season in Tarifa, a few trips to Brazil. I started this site because the maintenance advice online was either vague or wrong, and I got tired of watching riders show up with gear that should have been retired two seasons ago. I fix what other people ignore.